
How to Use Winter Downtime on the Homestead
Winter on a homestead can feel like everything's on pause—garden dormant, nothing growing, just waiting for spring. Even thought there’s usually still enough to do, now is the time to tackle things you didn’t have time for last season.
If your homestead is quite new, you’ll probably spend a lot of time fixing buildings etc. in winter. After the first snow storm, the chicken coop isn’t warm enough, that new greenhouse needs a bit more wind proofing, because of the frost a door isn’t closing anymore, and lots of nooks and crannies let snow into outbuildings. This is absolutely normal. It took me about three or four winters to optimise everything.
But if you’re not too busy with fixing, the cold months are pure gold for getting ahead for the next season. While most people retreat in their dens to hibernate, smart homesteaders are building, preparing, improving and planning. And let’s face it – homesteaders aren’t used to do “nothing” (besides the daily chores). To not get bored, here are some ideas on how you could use this winter season.

I. Building Essential Equipment
Forget expensive equipment catalogues and fancy homesteading shops. Winter's the perfect time to build what you actually need using salvaged materials, scrap wood, and a bit of creativity. Cold weather means no insects bothering you, no rush to preserve food before it spoils, and plenty of time to get things right.
DIY Smokehouse
A smokehouse sounds complicated, but it's basically a box with controlled airflow. You need four walls, a roof, and adjustable vents—that's it. Old pallets make perfect frames (free from most shops), salvaged metal roofing keeps rain out, and barn boards with natural gaps let smoke escape. The only thing worth buying? A simple digital thermometer to monitor temperature.
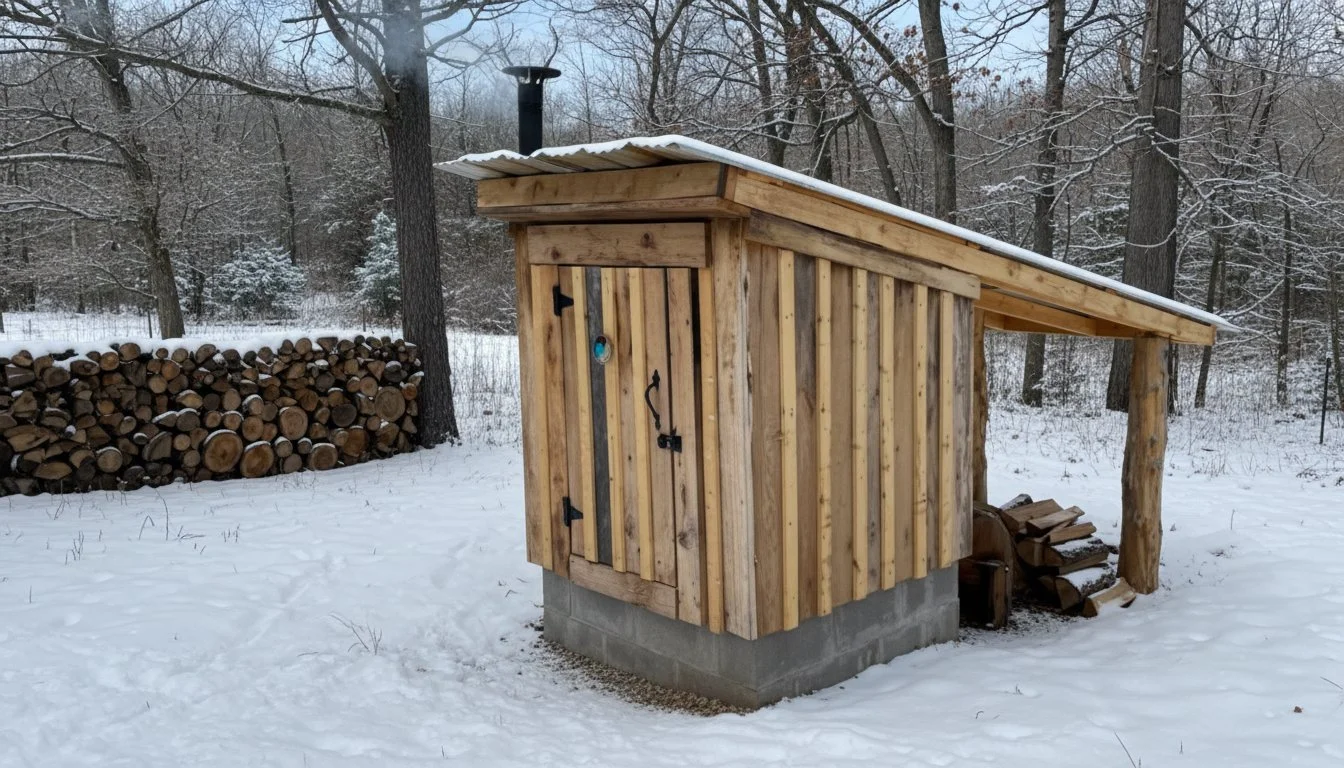
Your foundation can be stones from the property mixed with leftover concrete—dig down 60 cm in cold climates to get below the frost line. For the vents, just hinge some boards at each gabled end. Open them wide for more airflow, close them for intense smoke. The beauty is you can't really mess this up. Too smoky? Open the vents. Not enough smoke? Add more wood chips.
Start small if you're nervous. Even a converted old refrigerator works as a starter smokehouse. Remove the motor, drill a hole in the bottom for smoke intake, another at the top for exhaust. Ugly? Absolutely. Functional? You bet. That first taste of home-smoked salmon or cheese will have you planning a bigger version immediately. Here is a great video from a fellow homesteader on how to build a smokehouse.
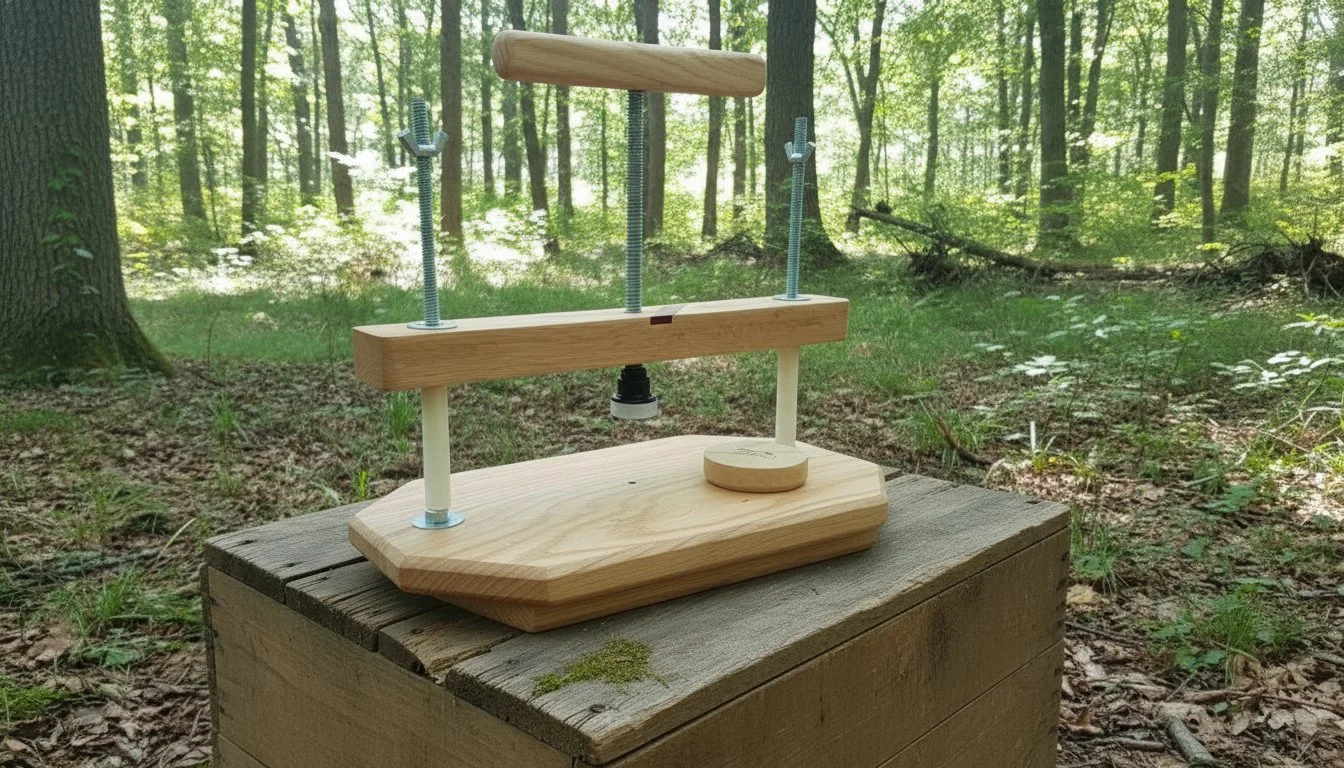
DIY Cheese Press and Grain Mill
Commercial cheese presses cost hundreds. Yours? Free. Find two thick boards (old shelving works), four chunks of firewood for legs, and some dowels or even straight branches. Stack them up, add weight on top (books, stones, water jugs), and you're pressing cheese like your great-grandmother did.
For grain mills, skip the 500-dollar hand-crank versions. Three pieces of black iron pipe from the plumbing section create a pounding mill that works like a giant mortar and pestle. One pipe fits inside another with your grain, the third acts as a pestle. Yes, it's work. But there's something deeply satisfying about the rhythm—pound, turn, pound, turn. Your arms get a workout, your grain becomes flour, and you spent maybe a few bucks at a secondhand shop.
The flour won't be supermarket-fine, but that's actually better. You taste the grain, feel the texture. Real bread from real flour you made yourself. Start with small batches—a cup of grain at a time until you find your rhythm. Soon you'll be grinding enough for a week's worth of bread in half an hour.
II. Strategic Winter Shopping
Winter planning isn't about making lists—it's about positioning yourself to thrive when growing season hits. This is reconnaissance time, bargain-hunting season, and your chance to think clearly without the pressure of daily harvests and weeding.
The Art of Off-Season Shopping
December/January seed sales can save you 75% because nobody's thinking about tomatoes when it's snowing. Estate sales, barn cleanouts, and online marketplaces overflow with tools and supplies from people "decluttering" during indoor months. That expensive garden tool you couldn't justify? Someone's selling it for a tenth of the price because they're moving or gave up gardening. Just keep looking.
Keep a running list during growing season—every time you think "I wish I had..." write it down. Come winter, that's your treasure hunt list. Check online marketplaces weekly, visit secondhand shops regularly, ask neighbours what they're getting rid of. One person's clutter is your next essential tool.
I found out looking for the things you have to buy in winter is the best you can do. First, you’re saving a lot of money, you still have time to fix something used and might be broken, and everything’s ready when you need it.
III. Next Year's Firewood Strategy
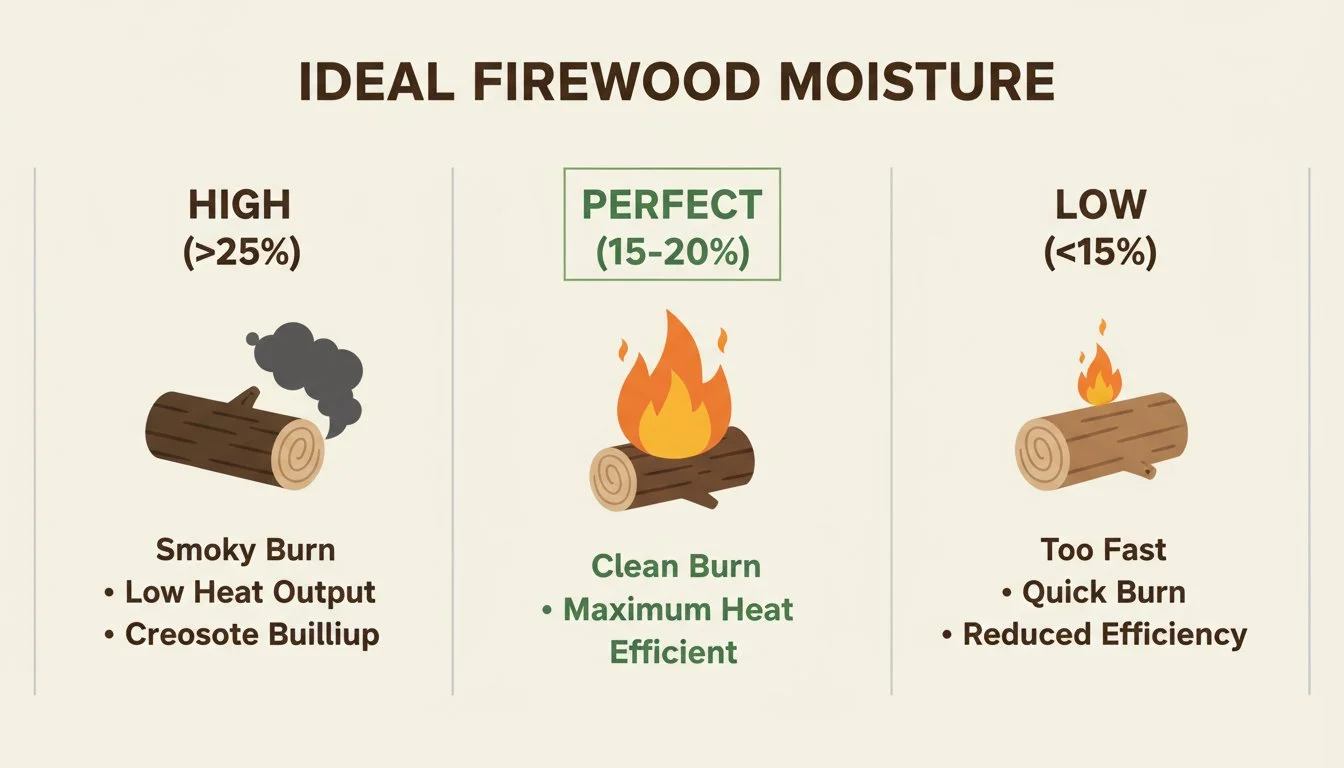
Winter-cut wood is superior in every way. The ground is frozen, which makes it so much easier to use the tractor, and sap's down, making logs lighter and faster-drying. No insects, no humidity, and snow to easily slide the trees on. Just clean, efficient work that sets you up for next year and doesn’t rob you time when you’re super busy in high-season.
The Science of Winter Wood
Trees are basically dormant in winter, with sap concentrated in the roots. This means less moisture in the wood, faster drying time, and easier splitting. Wood cut now and stacked properly will be perfectly seasoned by next winter—something that takes eighteen months if you cut in summer.
The work itself becomes meditative without summer's pressures. No mosquitoes, no race against rain. You can take breaks, perfect your splitting technique, enjoy the silence. I like to do some by hand, even though I have a log splitter, just to keep that homesteading gym going - free exercise and surprisingly satisfying. Each piece you split is next year's warmth already secured. You know the saying: Firewood warms you three times!
Stack everything off the ground using pallets, cover just the top (sides need airflow), and watch your security grow. There's profound peace in seeing those neat rows, knowing you're ready. While others panic-buy expensive kiln-dried wood next autumn, you'll be sitting pretty with perfectly seasoned fuel that cost you nothing but honest work.
IV. Tool Maintenance and Infrastructure
Your future self will thank you for every hour spent on tools and infrastructure during winter. This invisible work—sharpening, oiling, building, fixing, organizing—is what separates smooth growing seasons from chaotic ones.
Workshop Nights That Save Your Sanity
If you’re like me, the season behind you leaves the workshop and the tools in a bit of a chaos. Just too much to do to organise everything all the time. Now is the time to make inventory, organise new, fix broken tools and maintain them. Pick one evening a week for tool care. Coffee, music, and systematic attention to every tool you own. That broken handle you've been working around? Fix it now with a branch from the woodpile. The dull hoe that makes weeding torture? A few passes with a file (or even a rough stone) transforms it.
Build a tool board from any scrap wood—ugly is fine, functional is essential. Bent nails hold tools, painted outlines show what's missing. When spring explodes and you're juggling twenty tasks, you'll grab exactly what you need without searching. This organization isn't fancy; it's survival.
Oil wooden handles with whatever oil you have—cooking oil works fine. Sharpen everything, even if it seems sharp enough. Check for loose heads, cracked handles, rust spots. Every problem solved now is a crisis avoided later. Your tools are your partners; winter's when you show them love.
Building Homes for Garden Allies
Native bees need holes—it's that simple. Drill 5-8mm holes in old fence posts, scrap wood, even bamboo bundles. Different sizes attract different species. February's perfect for this because the bees arrive in early spring, ready to pollinate everything you're growing.
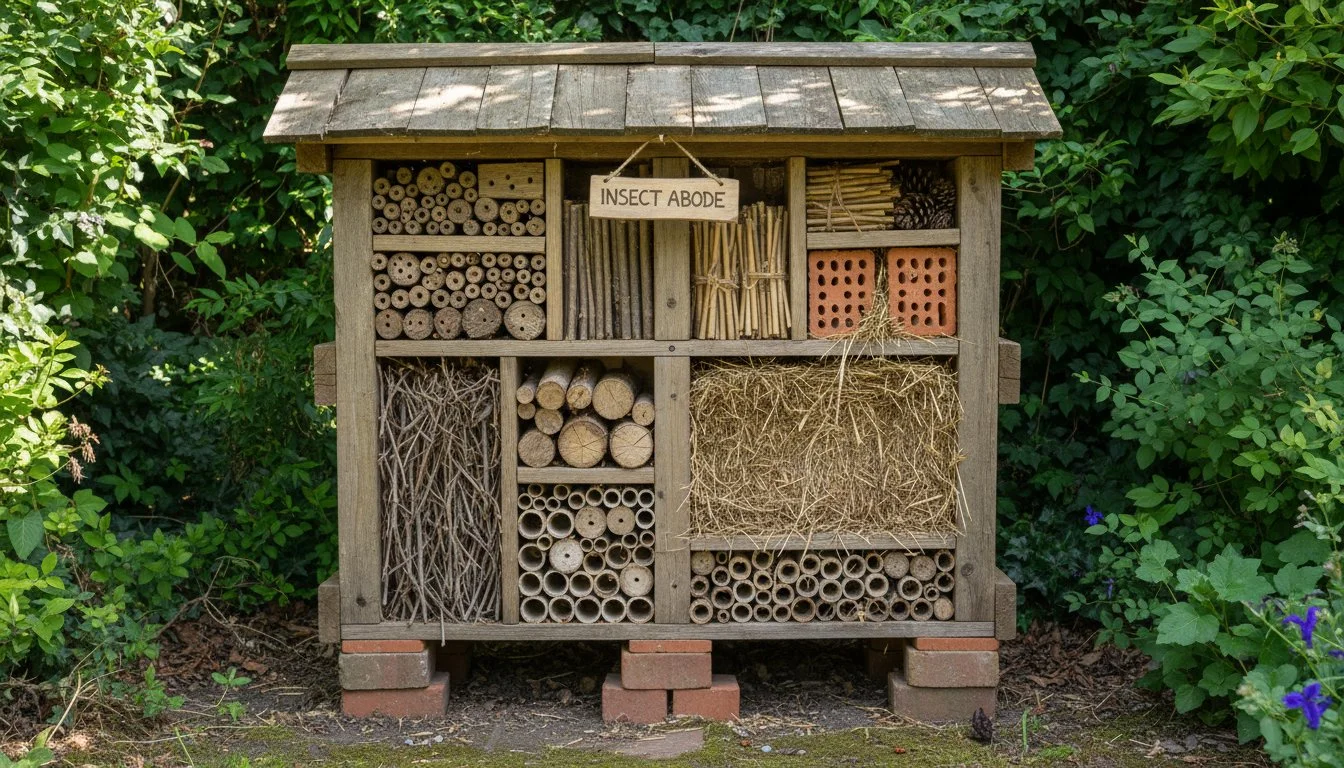
These tiny projects—bee hotels, bird boxes from scrap, toad houses from broken pots—cost nothing but transform your land into a living ecosystem. As Jane Goodall reminds us, every small action creates ripples. Those holes you drill become homes for pollinators that ensure your harvest. No bees, no fruit. It's that direct.
V. Vegetable Garden Planning That Sets You Up for Success
While snow covers the ground, successful gardens are being mapped out on kitchen tables everywhere. This is when you plan crop rotations, order seeds, and figure out what you'll actually grow versus what just sounds good in catalogues. No pressure, no rush—just clear thinking about next season's abundance.
My tip: I have a “Homestead diary”, where I mainly write down information about growing vegetables throughout the season. What went good, what went wrong, what to consider next year, what to improve, what I need. This helps a lot to improve your growing and saving costs.
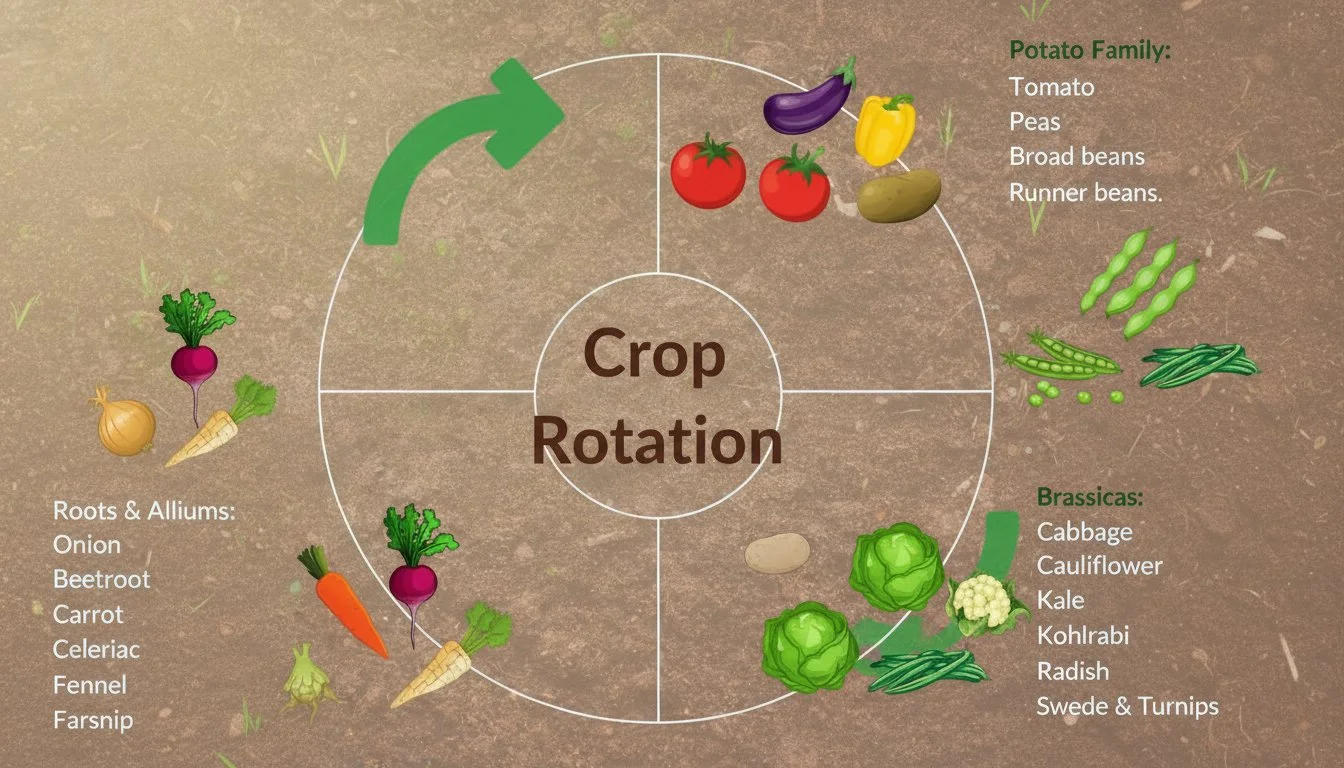
Crop Rotation and Garden Mapping
Grab some paper to draw your garden beds and note what grew where last year. Crop rotation isn't complicated—just remember that potatoes shouldn't follow tomatoes (same diseases), and hungry crops like cabbages love following beans or peas that actually improve the soil.
If you're planning to sell produce, calculate space realistically. A 10 x10 meter plot yields enough potatoes for a decent farm stand plus your own cellar. Onions and garlic are perfect starter market crops—they store well, everyone needs them, and the profit margin is surprisingly good. But you need to plan the space now, not when planting time arrives.
Don't forget succession planting in your plans. Lettuce every two weeks, beans in three sowings, carrots monthly from April. Write these dates on your calendar now. Include a "chaos bed" somewhere—for those impulse seedlings that always appear. Oh, and don’t forget your little helpers, the bees! Plan flowers that provide food for them from spring until late fall.
Seeds, Potatoes, and Early Starts
Seed potatoes need ordering by January. By March, everyone's panic-buying and variety selection is gone. Same principle applies to onion sets, though growing onions from your own saved seed opens up amazing variety options.
Here's what surprises people: onions from seed need starting around Christmas. They need 12-14 weeks to become sturdy transplants. A sunny windowsill works, or basic shop lights with a bit higher lumen. Those tiny seedlings in December become tennisball-sized onions by August. The same timeline applies to leeks, celeriac, and artichokes if you're feeling adventurous.
Greenhouse Strategy
If you have a greenhouse, plan their layout now on paper. Tomatoes are divas—they prefer their own space without humidity fluctuations from other crops. Dedicate one greenhouse to them if possible (I did that and they love it – built from old windows). The other can house your united nations of heat-lovers: peppers, cucumbers, aubergines, basil. I also have backup-veggies in the big greenhouse, if anything goes wrong outside.
Calculate spacing realistically. Tomatoes need 45 cm minimum. Plan support systems now while you have time to build them from scrap materials—bamboo, branches, old fence wire all work. With planning now, you can buy the seeds you couldn’t harvest last season for cheap.
Remember: the best garden isn't the biggest—it's the one you can actually manage. Start smaller than you think, plan bigger than last year, and always leave room for experiments.
Wrapping Up
Winter isn't downtime—it's your secret weapon. While others scroll through phones waiting for spring and gaining weight, you're building, preparing, getting ahead — and stay fit. Every project completed now, every tool sharpened, next structure built—it all compounds into a smoother, more productive growing season. I love the bit slower winter time—the time to reflect, plan, dream. And in February I can’t wait to start all over again!